
Teaching Math with Base 10 Blocks
 It is my firm opinion that the only manipulatives necessary to teach math are base 10 blocks and fraction circles. I made my own classroom sets of each. Well, I should be entirely honest. My dad, who had a wood shop, made my base ten blocks. I wanted LOTS of them. Commercial sets were too expensive.
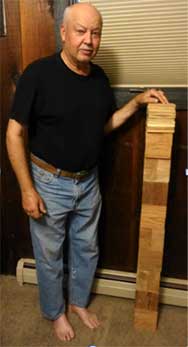
Base 10 blocks consist of unit cubes (1/2" x 1/2" x 1/2"), ten rods (1/2" x 1/2" x 5"), and hundred flats (5" x 5" x 1/2"). I also had thousand cubes (5" x 5" x 5") for demonstration. I made ten of them so children could stack them to see the value of ten thousand. I always wanted a ten thousand rod (5" x 5" x 50"), a hundred thousand flat (5" x 50" x 50") and a million cube (50" x 50" x 50"). Not solid, of course. Where would I store it? I thought I might use dowels that fit together so kids could see how much space a million cube would take! It would be an eye-popping illustration of place value!
 I had Dad make the pieces for 30 student sets of base 10 blocks (gallon Ziplocks containing unit cubes, 20 ten rods, 2 hundred flats and 5" x 5" pieces of paper to represent additional hundreds). I stored them in a box and distributed them to students when introducing every new math concept that fit. When I first passed them out to the kids, I gave them time to just play with the blocks and tell me if they could suggest any ways the blocks might be useful for learning math. Because kids enjoy playing with the blocks, it helps to get the urge to play out of the way before employing the blocks for "work." Because the temptation to play remains great, I collected all bags at the end of each lesson and stored them back in the box. They remained popular for play when we had indoor recess.
Sequence of lesson ideas for utilizing classroom sets of base 10 blocks
Introducing Place Value
 Show a unit cube and define it as a "unit" or "one."
- Put ten unit cubes side by side and place a ten rod next to it. Observe that they're the same length. Define the rod as a "ten."
- Put ten ten rods side by side. Make a square with 100 unit cubes. Show that a hundred flat is the same size, the same quantity. Define the flat as a "hundred."
- Stack ten hundred flats together. Show that a thousand cube is the same size, the same quantity. Define the large block as a "thousand." Notice that the shape of the thousand cube is the same as the shape of the unit cube, except that the thousand cube is a whole lot bigger.
- Stack ten thousand blocks to illustrate ten thousand (see photo). Notice that the shape of ten thousand is the same as the shape of a ten rod, only it's a whole lot bigger.
- Measure off or try to imagine the size a hundred thousand flat and a million cube.
- For older children: teach them how to fill out the place value chart and have them do it daily until they master it. Write ones, tens, hundreds, one thousands, ten thousands, hundred thousands, one millions, ten millions, hundred millions, etc. Notice the pattern: one, ten, hundred; one, ten, hundred. I call each grouping a "family" and the family names are units, tens, hundreds, thousands, ten thousands, etc.
- Challenge: Learn place values through decillions. See Facts Plus p. 201.
 Reading and Writing Numbers
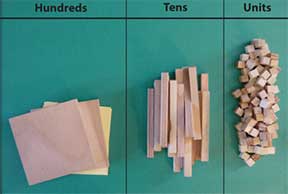
- On 12" x 18" pieces of paper (one per child), prepare charts labeled hundreds, tens and units (see photo to the right).
- Teacher assembles pieces for a variety of numbers on the chart: 9; 35; 273; 762; etc. Child writes the number in the place value chart.
- The teacher writes a number and the child assembles the appropriate pieces on the large piece of paper (see photo to the right).
Zero as Place Holder
- Teacher assembles pieces for a variety of numbers using zero as a place holder: 106; 30; 520; 200. The child writes the number on a place value chart, using zero as needed.
- Teacher writes a number. Child assembles the appropriate pieces to show the value, placing no pieces in a column with a zero.
Addition Facts
- Use the base 10 blocks (or beans, pretzels, whatever) to generate a table of addition facts.
- Show that 3 + 5 and 5 + 3 are exactly the same.
Addition Facts Masters
- Practice with flash cards the ones; then twos; then zeros, ones and twos; then threes; then zeros, ones, twos and threes; then fours; and so on.
- Do daily facts practice, aiming for a mastery level of 100 facts in three minutes or less. See sample worksheets from Addition Facts in Five Minutes a Day.
Addition with No Regrouping
- For example: 35 + 23. The child uses his 12 x 18 chart to lay out 35, then 23. Combine the ones and write the total in the ones column. Combine the tens and write the total in the tens column.
- Continue with problems not requiring regrouping into the 100s and even 1000s place (if you have 1000s blocks).
Addition with Regrouping
- 75 + 17. Child lays out 75 and 17. Combine the units. Count them. When you get to ten, exchange the ten unit cubes for a ten bar and place it with the tens. Start counting units again from one.
- Write the ones in the units column. Then count the tens and write the total in the tens column.
- Continue until this process is understood and automatic.
- Continue with problems requiring regrouping into the 100s place.
- Transfer to paper by doing each step with manipulatives and showing how it is represented on paper. Once a child understands, have him use paper exclusively. The manipulatives can be used for review when needed.
Column addition. Adding by endings.
This doesn't require manipulatives, but this is a good time to teach the concept. It enables children to compute huge addition problems correctly. See the Marvelous Math handout for directions.
Subtraction Facts
- Use the unit cubes to generate a table of subtraction facts.
- Show relationships, such as 3 + 5 = 8, 5 + 3 = 8, 8 - 3 = 5 and 8 - 5 = 3.
Subtraction Facts Masters
- Practice with flash cards the ones; then twos; then zeros, ones and twos; then threes; then zeros, ones, twos and threes; then fours; and so on.
- Do daily facts practice, aiming for a mastery level of 100 facts in three minutes or less. See sample worksheets in Subtraction Facts in Five Minutes a Day.
Subtraction without Regrouping
- 55 - 32. Child lays out 55. Take away 2 units and write the number of the remaining units (3) in the ones column.
- Take away 3 of the tens and writing the number of remaining tens (2) in the tens column.
- Continue. Later include problems not requiring regrouping into the 100s place.
Subtraction with Regrouping
- 34 - 18. Child lays out 34. Try to take away 8 ones. There aren't enough. Where can you find more? Take one of the tens and exchange it for 10 units (you could cut it into ten units, but exchanging has the same effect). Now take away 8 ones and write the remainder, then take one ten from the 2 tens that remain. The answer is 16.
- Do lots of these without pencil and paper when introducing the concept. Make sure each child really understands the concept and can explain it. Continue to the 100s place.
- Transfer to paper and pencil by showing each step first with manipulatives and then as represented on paper.
- Do problems with pencil and paper and use manipulatives to check your answer.
- Use the base 10 blocks for review if problems surface.
Subtraction across Zeros
- 103 - 57. Child lays out 203. There aren't enough ones to take 7 away. Where can you find more? No tens. How can you get some tens?
- Take a hundred and exchange it for ten tens, then take a ten and exchange it for ten ones.
- Now take 7 away and write the remainder in the ones column. Take 5 tens away and write the remainder in the tens column.
- Do lots of these with manipulatives before going to paper and pencil. Transfer to paper and pencil gradually when the child really understands the concept.
Multiplication Facts
- Use unit cubes to generate the times tables in a grid. Do no more than one table a day.
- Practice counting by 2's, 3's, 4's, etc.
Multiplication Facts Masters
- Practice with flash cards the ones; then twos; then zeros, ones and twos; then threes; then zeros, ones, twos and threes; then fours; and so on.
- Do daily facts practice, aiming for a mastery level of 100 facts in three minutes or less. See sample worksheets in Multiplication Facts in Five Minutes a Day.
Multiplication with Tens
- Do 10 x 3, 40 x 5, etc. (zero on either multiplier or multiplicand) using base 10 blocks. Note the pattern.
- Do 100 x 3, 40 x 30, etc. (zeros on both multiplier and multiplicand). Note and learn the pattern.
2 Place x 1 Place Multiplication
- 15 x 4. Lay out a grid 15 tall and 4 wide.
- Exchange any group of 10 units for a ten bar.
- Exchange any group of 10 tens for a hundred flat if needed.
- Write the total of each place value correctly on the place value chart.
- Later move on to 3 place x 1 place multiplication, etc.
2 Place x 2 Place Multiplication
- 21 x 42. To introduce, make a grid 21 high and 42 wide and fill it in. Move quickly to paper and pencil as students won't have enough manipulatives to do this in their individual kits.
- Practice this until it is mastered.
- Later move on to 3 place x 2 place multiplication, etc.
Gelosia Multiplication
No manipulatives are needed for this. The Gelosia method enables children to compute huge multiplication problems if they know their facts. It's a real confidence-builder. Directions are in the Marvelous Math handout and presentation.
Division Facts
- Use unit cubes to generate the division tables by laying out the dividend and "passing out" blocks into equal piles.
- Practice 1's with flash cards, then 2's, then 1's and 2's mixed, then 3's, etc.
Division Facts Masters
Practice with flash cards the ones; then twos; then zeros, ones and twos; then threes; then zeros, ones, twos and threes; then fours; and so on.
- Do daily facts practice, aiming for a mastery level of 100 facts in three minutes or less. See sample worksheets in Division Facts in Five Minutes a Day.
Division with Remainders
- 23 ÷ 5, for example. Lay out 23, then "pass them out" into 5 piles. How many piles? That is the quotient. How many are left over? That is the remainder.
- Do lots and lots of these with manipulatives before going to paper, then lots with both manipulatives and paper. Careful work now will make future work easy.
Division with Remainders and Two-Digit Answers
- 73 ÷ 4, for example. Lay out 73 (7 tens and 3 ones). "Pass out" as many tens as possible into 4 equal piles. Then take the ten left over and exchange it for ten units.
- Next, "pass out" the units. Any left over are the remainder, as before.
- Continue with numbers into the hundreds when this has been mastered.
Fractions
Children should understand fractions before they move on to decimals because otherwise they may memorize the "rules" for working with decimals but they probably won't understand the concept. Click here for fractions lessons with manipulatives.
Decimals
- Place value is the most important and sometimes the most difficult concept in decimals.
- Have children imagine that the unit cube "grows and grows and grows" until it becomes the size of the thousand cube (5" x 5" x 5"). Redefine what you previously used as a thousand block as a "unit." Emphasize that it is the same shape, only larger. The pieces would be too small if we to cut up the small unit cubes into tenths, hundredths, and thousandths. (I always thought it would be fun to have some teeny-tiny tenths, hundredths and thousandths, and a pair of tweezers, for illustration purposes.)
- Ask how many tenths are in a whole. (They should know this from learning about fractions.) Ten. Which of the blocks would represent a tenth, in that case? The flat. Demonstrate that 10/10 equals one unit.
- Ask how many hundredths are in a whole. One hundred. Which of the blocks would represent a hundredth? The bar. Demonstrate that if you have 100 bars, it equals one unit cube.
- It's a good idea to work extensively with tenths and hundredths before introducing thousandths.
Decimal Place Value Chart
 Use 12 x 18 paper to create a decimal chart similar to that shown above for whole numbers. Lay out a number and have the child write it in the decimal place value chart. Emphasize saying "and" at the decimal point, and clearly saying tenth, hundredth, etc.
 - Write a number with decimals and have the child lay out the blocks.
- Say a number and have the child lay it out.
- 43/100. Four tenths and three hundredths. This could also be forty-three hundredth if "broken down" to the smallest pieces.
- Have children fill in the decimal place value chart day after day until they master it.
Expanded Numeration
- Lay out a number such as 5.38 on the 12 x 18 chart. Show that there are 5 units, 3 tenths, and 8 hundredths.
- Have the child write 5 + 3/10 + 8/100.
- Do several with manipulatives until the concept is understood, then transfer to paper and pencil.
Zero as Place Holder
- This concept is often confusing. How would you write 3/10? Write it in the decimal place value chart: .3
- How would you write 3/100? Write a 3 in the hundredths place. What goes in the tenths place? A zero because there are no tenths. It's .03
- There is no need for zeros after the final numeral in a decimal number. They don't mean anything. .3 = .30 = .300 and so on. (Later, this concept will be useful when subtracting. Zeros may be added without changing the value when necessary.)
Adding Decimals
- Use base 10 blocks and decimal place value charts to add decimals. Notice how everything centers on the decimal point. That is the reference point for place value.
- When adding decimals on paper, make sure the decimal points are aligned.
Subtracting Decimals
- Use base 10 blocks and a decimal place value chart. Lay out the pieces for the minuend. Take away the appropriate number of each and write the difference in that column. Regroup just as in regular subtraction.
- Note that 3.5 - 2.86. 3.5 = 3.50. The child will need to add a zero and then borrow to be able to take away 6. Exchange a tenth for hundredths.
Go on to read Beginning Fractions Lessons
Source: www.SusanCAnthony.com, ©Susan C. Anthony